Table of Contents
ToggleA featherboard isn’t glamorous, but it’s one of those shop accessories that instantly levels up your table saw work. It keeps workpieces pressed against the fence, prevents kickback, and gives you cleaner cuts without white-knuckling the stock. Whether you’re ripping thin strips or running long boards solo, a featherboard acts like an extra set of hands, hands that won’t slip or fatigue halfway through the cut. Understanding how to pick, position, and use one properly transforms frustrating tear-out and wandering cuts into repeatable, accurate results.
Key Takeaways
- A table saw featherboard uses flexible fingers to apply consistent lateral pressure against the fence, preventing kickback and reducing the 30,000+ annual table saw injuries reported by the CPSC.
- Featherboards eliminate hand-guided cutting inconsistencies by providing mechanical pressure, resulting in cleaner edges and more accurate cuts without wavy lines or snipe on workpieces.
- Proper positioning is critical—featherboards must sit 1 to 2 inches ahead of the blade with fingers flexed 1/8 to 1/4 inch when stock is in place; never position behind or beside the blade to avoid kickback.
- Choose between single featherboards for basic ripping ($15–$20), dual-head units for resawing and versatility ($30–$40), or magnetic models for fast setup on ferrous table saws.
- Test every featherboard setup with scrap wood before final cuts, adjusting pressure if you see burn marks or wavy edges, and always verify clearance with your push stick path.
What Is a Table Saw Featherboard and How Does It Work?
A featherboard is a safety and precision jig with flexible fingers (or feathers) cut into one edge. Those fingers flex when you push stock through, applying consistent lateral pressure toward the table saw fence or downward pressure onto the table. The feathers bend in one direction only, so material can slide forward but can’t pull back, this passive resistance is your first line of defense against kickback.
Most featherboards are made from high-density plastic (often ABS or nylon) or hardwood like maple or oak. Plastic versions resist moisture and won’t damage carbide saw teeth if contact happens. Hardwood featherboards can be shop-made and offer stiffness, but they’re less forgiving if they touch the blade.
The fingers typically angle at 30 to 45 degrees and flex under pressure. That flex creates spring tension, holding the workpiece snugly without clamping it dead-flat. When positioned correctly, a featherboard should apply firm, even pressure across several inches of stock, enough to prevent drift, not so much that it creates burn marks or stalls your feed rate.
Featherboards mount to the saw table via T-tracks, miter slots, clamps, or magnetic bases. Positioning is critical: the featherboard should sit ahead of the blade, never beside or behind it. Placing it behind the blade can pinch the kerf closed and cause violent kickback.
Why Every Woodworker Needs a Featherboard
Kickback prevention tops the list. According to CPSC data, table saw injuries send over 30,000 people to emergency rooms annually, with kickback being a leading cause. A featherboard won’t stop every kickback scenario, but it significantly reduces the chance of stock lifting, twisting, or reversing during a cut.
Beyond safety, featherboards improve cut quality. They eliminate the micro-movements your hands make when guiding stock, slight pressure variations that show up as wavy edges or snipe. This matters most when resawing thin veneers, ripping narrow strips, or edge-jointing boards for glue-ups. Consistency beats technique here: even skilled woodworkers benefit from mechanical pressure.
They also free up hand position. Instead of pushing directly beside the blade (a risky habit), you can use push sticks or push blocks from behind while the featherboard handles lateral control. This is especially helpful for complex woodworking project plans that involve repetitive cuts where fatigue sets in.
Finally, featherboards make solo work safer. Running an 8-foot sheet of plywood or a long rip cut alone is manageable when you’ve got continuous pressure on the fence. It’s not a substitute for outfeed support or a helper, but it bridges the gap when you’re working by yourself in a small shop.
Types of Table Saw Featherboards: Finding the Right Fit
Traditional Single Featherboards
Single featherboards are the classic shop staple: a single body with one row of flexible fingers. They typically measure 8 to 12 inches long and mount via a miter slot, clamp, or T-track bolt.
These work well for most ripping and crosscutting tasks where you need lateral pressure against the fence. They’re affordable (often under $20), compact, and easy to reposition. The limitation is coverage: a single unit applies pressure at one point along the cut, so longer workpieces may still wander if the stock has any bow or twist.
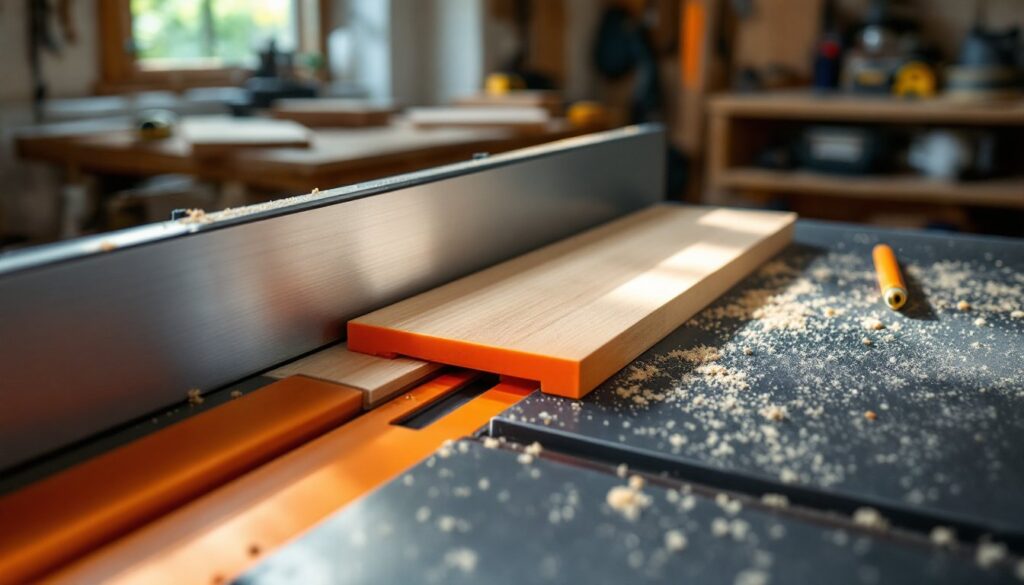
Shop-made versions are popular. You can cut feathers on a bandsaw, space them about 1/8 inch apart, and tune the angle to your saw. Use a hardwood like maple for stiffness or HDPE (high-density polyethylene) cutting board material for durability. Just ensure the fingers are thin enough to flex, about 1/8 to 3/16 inch thick, and long enough to provide 2 to 3 inches of travel.
Dual and Multi-Position Featherboards
Dual featherboards feature two adjustable heads on a single base, letting you apply pressure at two points simultaneously or configure one for horizontal and one for vertical hold-down. This is ideal for resawing, where keeping stock flat and tight to the fence matters equally.
Some advanced models include ratcheting or cam-lock adjustments, so you can dial in pressure without wrestling with hex keys mid-setup. Brands like Kreg, Bow Products, and Rockler make popular dual units that mount in standard 3/4-inch miter slots or proprietary T-track systems.
Magnetic featherboards have gained traction for cast-iron table saws. They use rare-earth magnets to stick directly to the table surface, skipping the need for miter slots or clamps. Positioning is fast, and they hold firmly, just verify your saw table is ferrous and clean. Workshop guides on hands-on DIY tutorials often recommend magnetic models for beginners who want setup speed without accessories.
Multi-position sets often include extension arms or stackable modules. These are overkill for occasional use but shine in production environments or when working with sheet goods where multiple hold-down points reduce vibration and chatter.
How to Properly Install and Position Your Featherboard
Start by raising the blade to full cutting height and positioning your fence for the rip width. Place the featherboard in the miter slot or clamp it to the table so the fingers contact the workpiece before the front edge of the blade, typically 1 to 2 inches ahead. This ensures pressure is applied during the cut, not after the kerf opens.
Adjust the featherboard so the fingers flex about 1/8 to 1/4 inch when the stock is in place. Too little pressure and the stock drifts: too much and you’ll burn the edge or bog down the motor. Slide a scrap piece through to test, there should be firm resistance, but you shouldn’t need to force it.
For vertical hold-down, mount a second featherboard above the table using a clamp on the fence or a dedicated vertical support arm. Position it so the fingers press down on the stock just ahead of the blade. This is critical for thin stock (under 3/4 inch) that can lift during the cut.
Never position a featherboard beside or behind the blade. If the stock binds or the kerf closes, the featherboard will trap it against the spinning blade, causing kickback. The only safe zone is ahead of the blade where the fingers guide the stock into the cut.
Double-check that the featherboard doesn’t interfere with your push stick path. You should be able to feed stock all the way through without your hands crossing the blade plane. If clearance is tight, reposition the featherboard slightly forward or use a longer push stick.
After the first test cut, inspect the edge. If you see burn marks, reduce featherboard pressure or check blade sharpness. If the edge is still wavy, increase pressure or add a second featherboard for longer stock. Many step-by-step project tutorials stress test cuts before committing to final workpieces, this applies double when dialing in a new featherboard setup.
Top Features to Look for When Buying a Featherboard
Mounting compatibility comes first. Measure your saw’s miter slot, most are 3/4 inch wide, but some Euro saws use metric tracks. If your saw has T-track slots, verify the featherboard’s bolt pattern matches. Universal clamp-style featherboards work on any saw but take longer to reposition.
Finger material and spacing affect performance. Plastic feathers (ABS, nylon, or polycarbonate) are forgiving and won’t damage tooling. Look for fingers spaced about 1/8 inch apart and at least 2 inches long for adequate flex. Some models have replaceable finger inserts, a smart feature if you use the featherboard daily.
Adjustability matters for versatility. Models with angle adjustments (usually 0 to 45 degrees) let you tune pressure direction for bevel cuts or tapered work. Dual-head units should have independent adjustment per feather, not a single fixed angle.
Build quality shows in the base and hardware. Cast aluminum or thick ABS bodies resist flexing under pressure. Cheap featherboards with thin plastic bases will bow or crack. Check that mounting bolts are stainless steel or zinc-plated, shop environments are humid, and rust compromises clamping force.
Pressure indication is a newer feature on premium models. Some include visual markers or tension springs that show when you’ve hit the optimal flex range. It’s not essential, but it speeds setup and ensures consistency across multiple cuts.
Finally, consider ease of storage and repositioning. Featherboards that require tools to adjust are frustrating mid-project. Cam-lock or thumbscrew designs let you tweak pressure and position without stopping to grab a wrench. Magnetic models are fastest but limited to ferrous tables.
Price ranges from $15 for basic single units to $60+ for adjustable dual systems. For most home shops, a mid-tier dual featherboard ($30–$40) with miter slot and clamp compatibility covers 90% of tasks. If you regularly work with sheet goods or do production runs, invest in a multi-position set with hold-down capability.